Design Ideas
Your initial design ideas are an opportunity to explore possible solutions that meet the design brief that has been set and the specification. Initial drawings do not need to be perfect and can be quick 'concept' sketches. Annotation should be added to explain your ideas in detail and depth.
When producing your design ideas you should be as imaginative as possible, use your research carefully and design new and innovative solutions to the problem set, linking them to the target market identified.
When producing your design ideas you should be as imaginative as possible, use your research carefully and design new and innovative solutions to the problem set, linking them to the target market identified.
Squiggle & Welding ideas
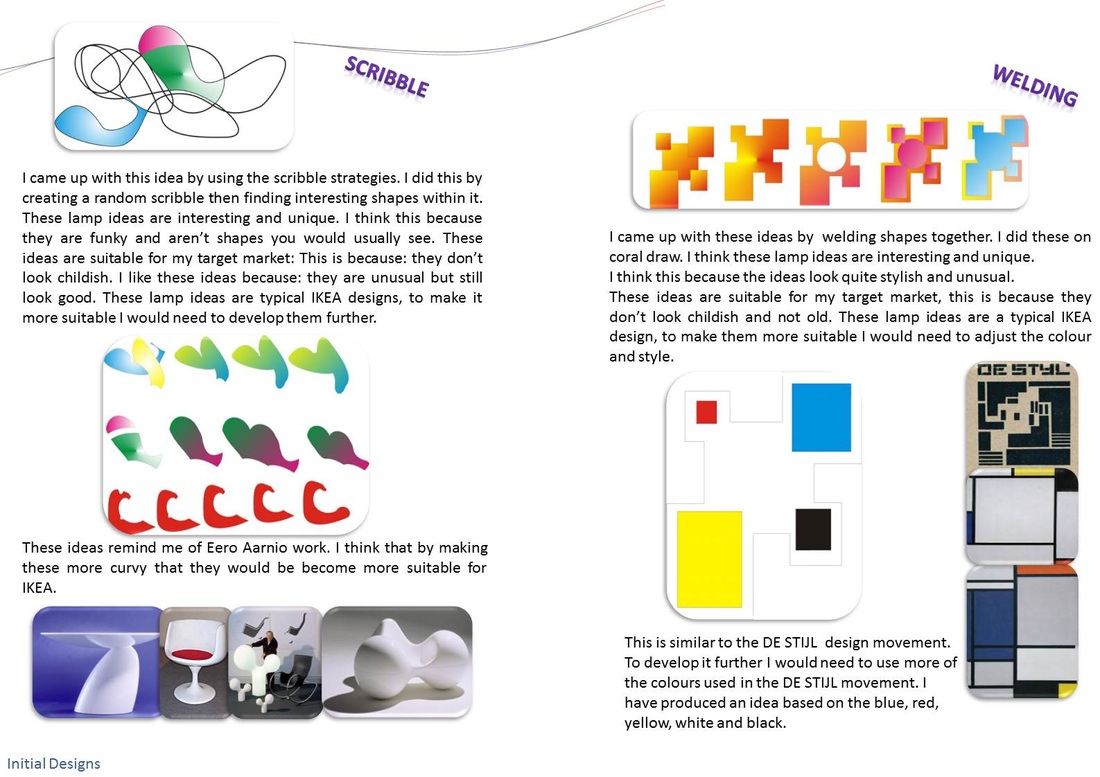
Initial ideas using Corel draw and shape develop to generate initial concepts. Annotation and Art movements referred to.
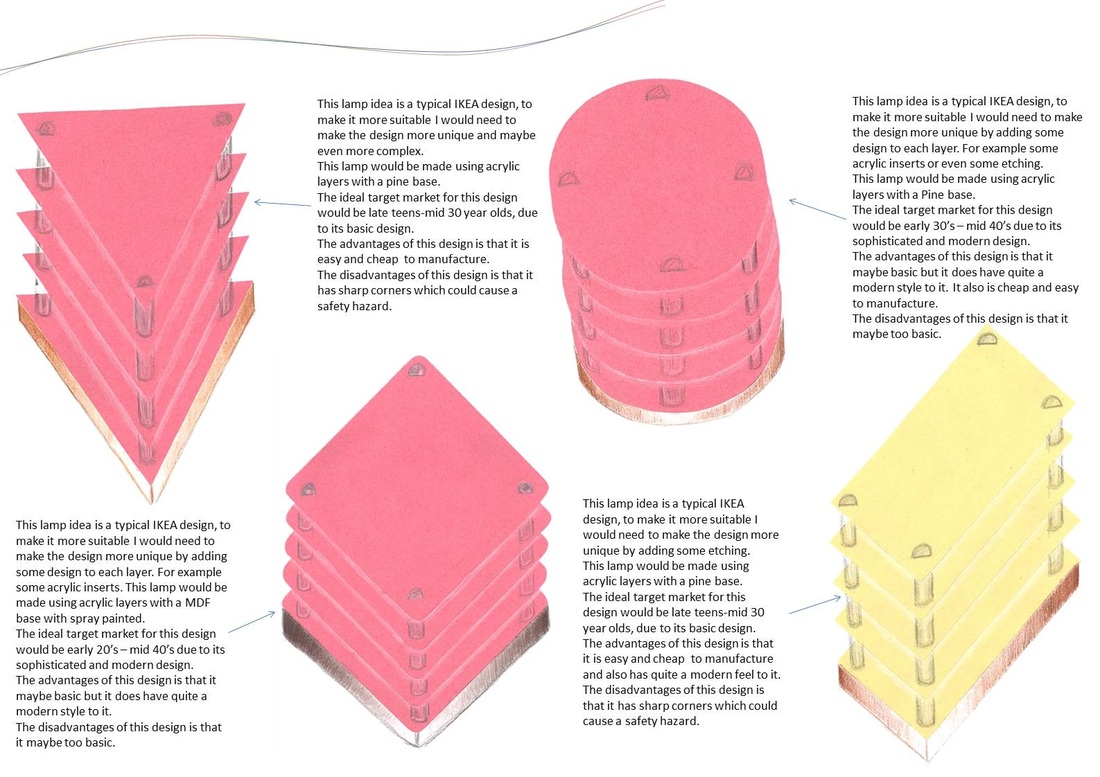
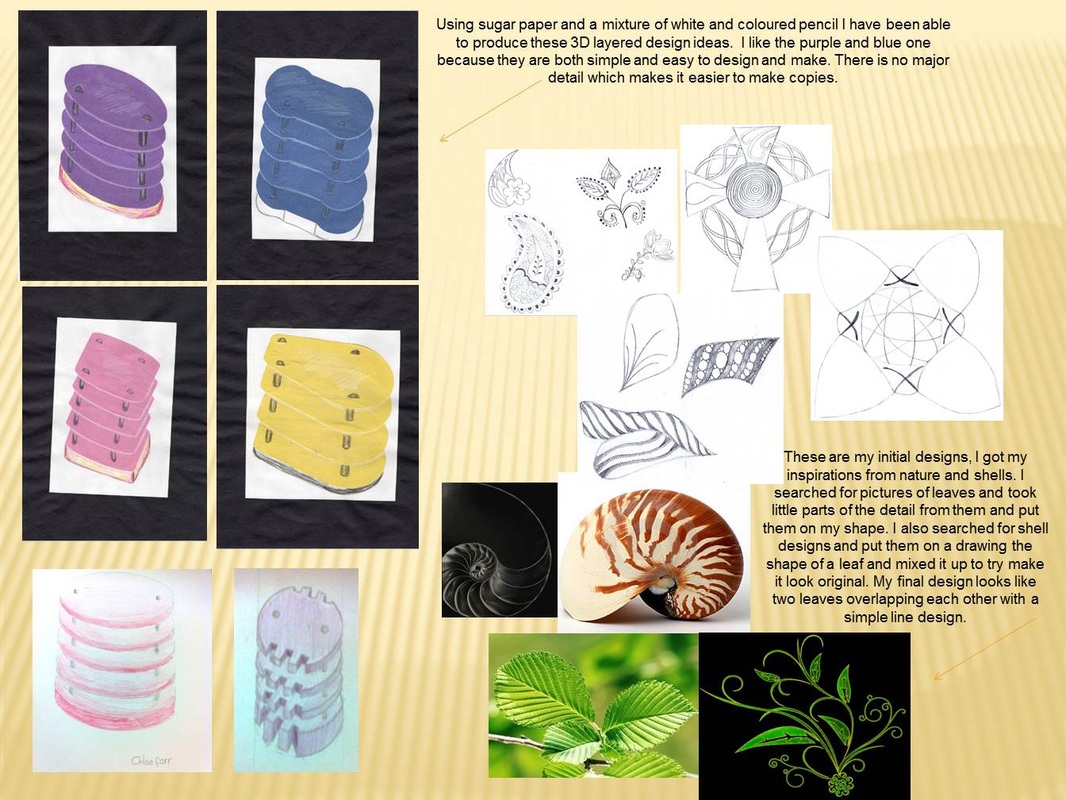
Sugar paper ideas
Initial ideas using sugar paper templates and over-layering to create initial three dimensional concepts. Annotation added.
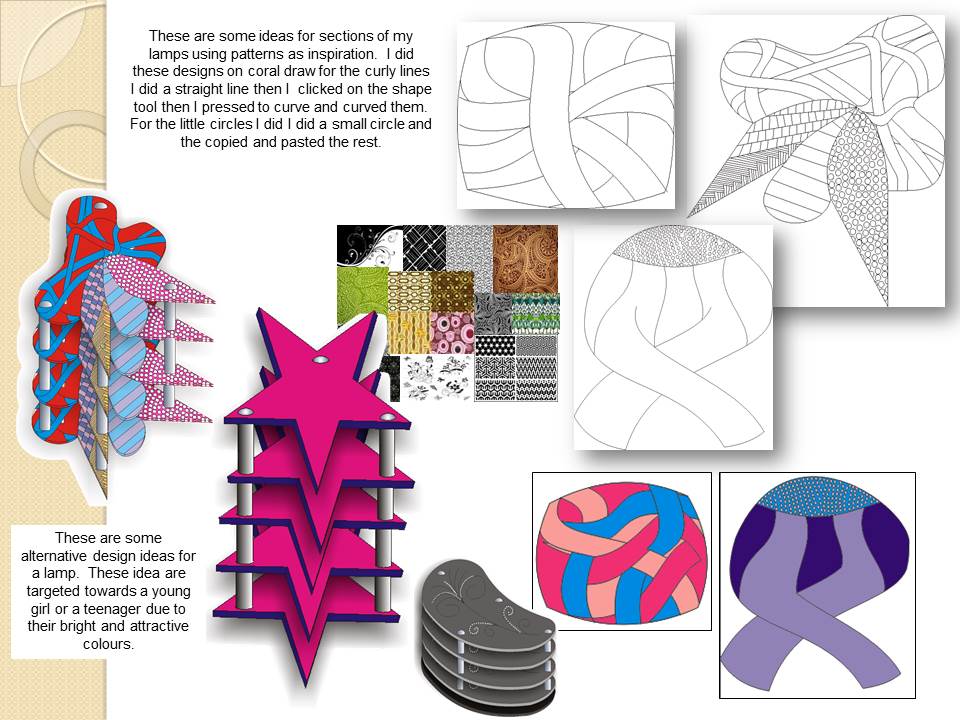
Pattern inspiration
Secondary research into different patterns/shapes seen in nature to inspire initial hand drawn and Corel draw design ideas.
Bitmap Tracing Using Corel Draw.

Bitmap tracing is a fantastic tool which allows you to select a clear image (either JPEG or scanned in from a hand drawing) and trace it into a hair line image ready for further editing or transferring into a laser file.
Remember if it is a laser file you are creating the line colours represent that tasks you wish the laser to perform.
Therefore cutting out would require a red line and etching a black line.
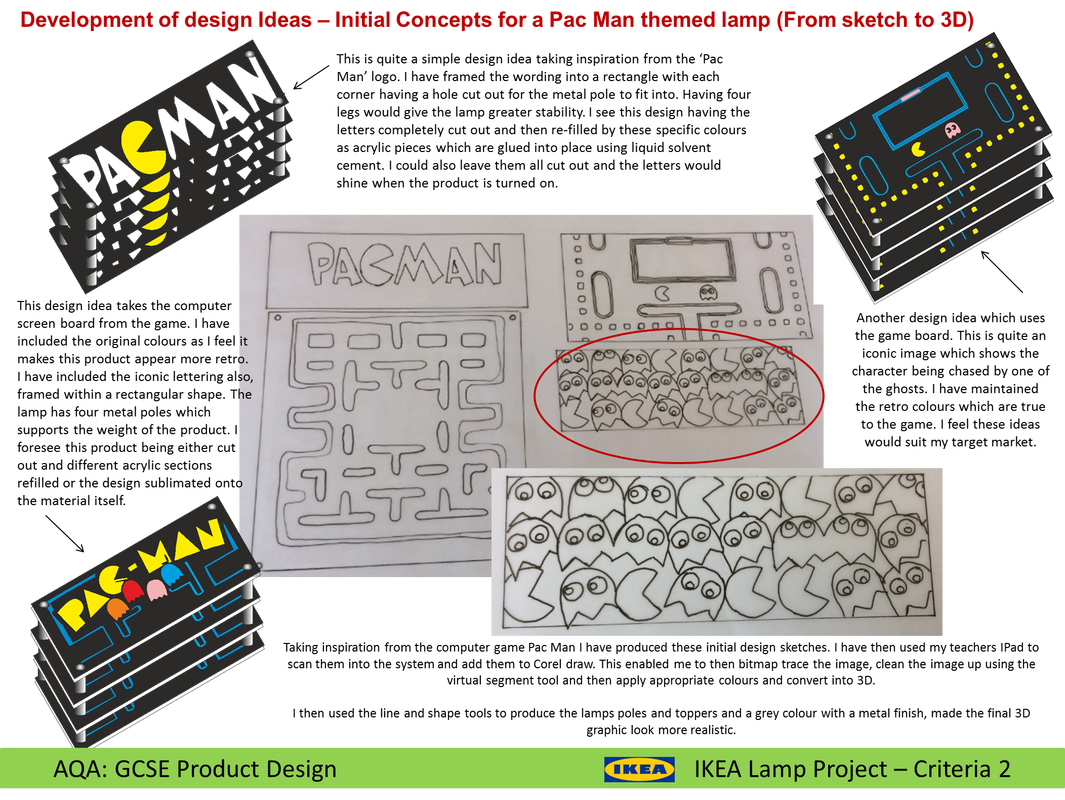
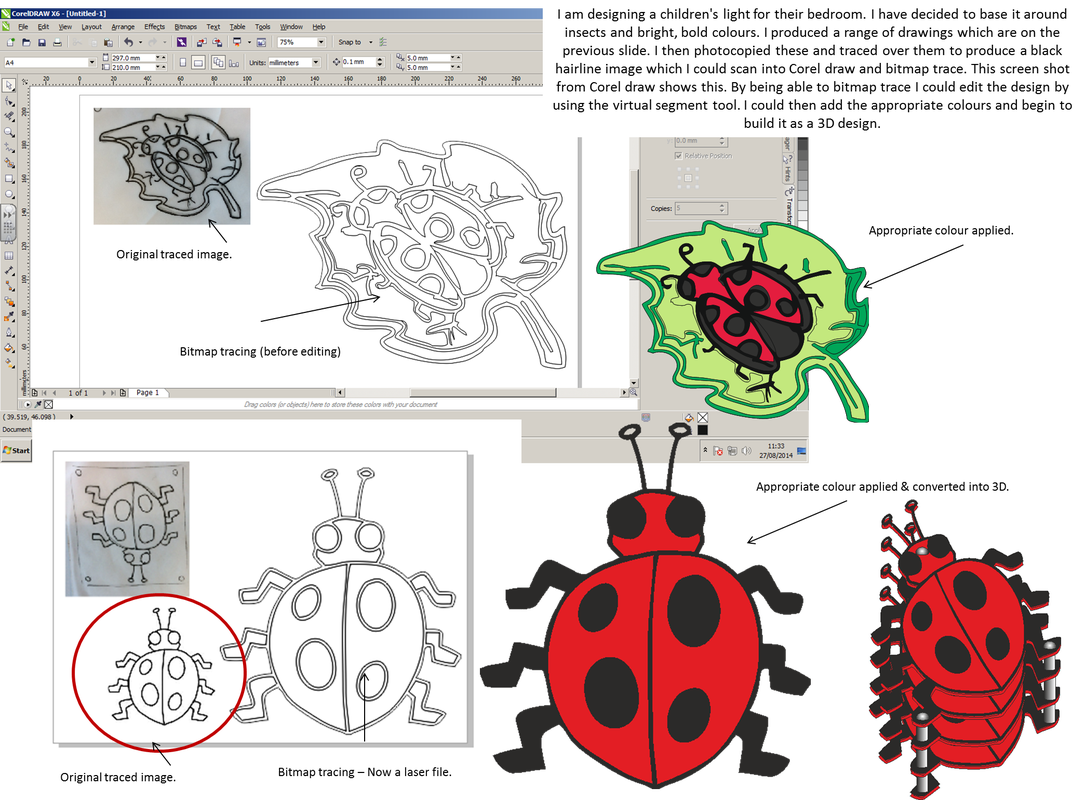
Bitmap tracing is often used by students in the early design stages and allows for designs to be easily edited, developed and converted into 3D.
Follow these clear steps to enable you to bitmap trace an image.
1) find the image you wish to bitmap trace (either internet or a scan)
2) copy and paste this onto a clean page in Corel draw
3) select the image using the cursor (this will be highlighted with black squared around the shapes outline.
4) next click onto the bitmap trace button (top tool bar)
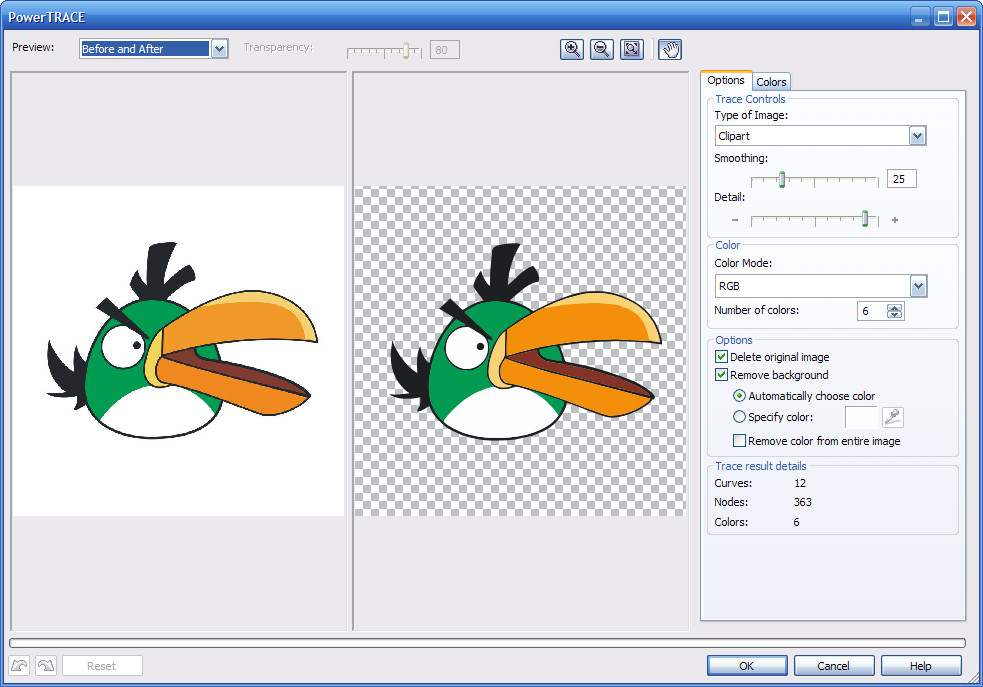
5) study the image you wish to trace and select the most suitable option from the menu. Often detailed logo is your best choice. Trial and error will need to be carried out however.
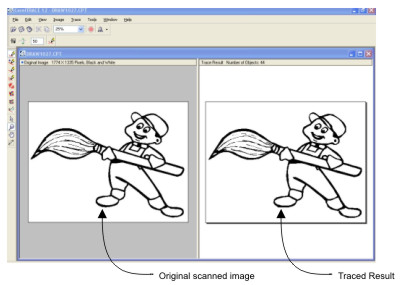
6) once selected the screen will split into two with the left side showing your original image and the right the one that has been traced. once complete click onto OK.
7) Next click on the traced image and drag to one side (revealing toe images. The original and the tracing)
8) Click onto the image and referring to the colour pallet pick the box with no colour and an 'X' within the box. This will initially make the image appear invisible.
9) Next click onto the pen tool (bottom right corner), select the width and change it to hair line (choose whether that is black - to etch or red to cut).
10) You should now have a Bitmap traced image. Which you can edit/change colour too etc.
It may require editing or the image cleaning up. To do that you will need to use the 'virtual segment delete tool'
Just remember when the pen tool is pointed DOWN you will be able to snip and remove areas you do not need. If you make a MISTAKE just click the GO BACK icon.
Remember if it is a laser file you are creating the line colours represent that tasks you wish the laser to perform.
Therefore cutting out would require a red line and etching a black line.
Bitmap tracing is often used by students in the early design stages and allows for designs to be easily edited, developed and converted into 3D.
Follow these clear steps to enable you to bitmap trace an image.
1) find the image you wish to bitmap trace (either internet or a scan)
2) copy and paste this onto a clean page in Corel draw
3) select the image using the cursor (this will be highlighted with black squared around the shapes outline.
4) next click onto the bitmap trace button (top tool bar)
5) study the image you wish to trace and select the most suitable option from the menu. Often detailed logo is your best choice. Trial and error will need to be carried out however.
6) once selected the screen will split into two with the left side showing your original image and the right the one that has been traced. once complete click onto OK.
7) Next click on the traced image and drag to one side (revealing toe images. The original and the tracing)
8) Click onto the image and referring to the colour pallet pick the box with no colour and an 'X' within the box. This will initially make the image appear invisible.
9) Next click onto the pen tool (bottom right corner), select the width and change it to hair line (choose whether that is black - to etch or red to cut).
10) You should now have a Bitmap traced image. Which you can edit/change colour too etc.
It may require editing or the image cleaning up. To do that you will need to use the 'virtual segment delete tool'
Just remember when the pen tool is pointed DOWN you will be able to snip and remove areas you do not need. If you make a MISTAKE just click the GO BACK icon.
|
If in doubt or if you get stuck, click on the attached You Tube videos for a tutorial on the steps needed to be taken to produce a Bitmap trace using Corel draw.
|
Bitmap Trace Tutorial Videos.
|
past student examples of bitmap tracing within their initial design ideas.
Whether it is a pattern that you have found on the internet or a design you have drawn on paper an excellent method of generating initial design ideas is to Bitmap trace the image using Corel draw and then build it up in layers to generate a 3D design idea. A drawn image can be scanned in (if it is clear and a hair line - single line, no colour or shading) and bitmap traced also.

how to draw 3d lamp designs using corel draw.
Corel Draw is a fantastic DT ICT program which enables you to create both 2D and 3D design ideas. You should have past experience in using this within key stage 3 and earlier in the GCSE course. Corel draw will be used from everything from initial design ideas, generating files which can be cut out using the laser cutter and producing 3D ideas. The following slides show you the step by step processes needed to successfully produce a 3D lamp idea.
You will be given a demonstration by your teacher in lessons, but if in doubt refer back to these steps to try and figure out independently any problems you have before asking for help.
You will be given a demonstration by your teacher in lessons, but if in doubt refer back to these steps to try and figure out independently any problems you have before asking for help.
Welding shapes to create unusual designs.
The following animation shows the step by steps needed to be taken to generate a range of ideas using the welding method. On Core draw you can draw a range of RANDOM shapes on top of one another and then by selecting ALL and then clicking onto the welding tool the shapes can be converted into one, singular shape. The shape will be unusual as the internal lines are deleted, leaving a weird and wonderful design; ready for further development.
metal feet & toppers
The lamps that you design and manufacture will have metal feet and toppers that you will manufacture using the Boxford CNC lathe out of metal. These will then need to be drilled and threaded so that they screw onto the metal rods that support the weight of your lamp product.
You will need to design a range of different feet and topper designs and then choose your best to develop further into manufacture. Following your teacher examples and demonstrations in lessons, please feel free to use these help slides to assist you in completion of the set work.
You will need to design a range of different feet and topper designs and then choose your best to develop further into manufacture. Following your teacher examples and demonstrations in lessons, please feel free to use these help slides to assist you in completion of the set work.

www.gcseproductdesign.weebly.com by Helen Dunn is licensed under a Creative Commons Attribution-ShareAlike 4.0 International License.
